Month: December 2015

Boo Boo Bunny

Boo Boo Bunny

My nephew gets hurt…a lot…so much that my husband nicknamed him Crash at 2 years old.  So when he is crying because he got hurt yet again he needs something to console him and usually ice to reduce the swelling.

When I was watching him the other day and he took a spill I asked him if he needed his bunny and he stopped crying.  He put the bunny on his boo boo (which was swollen and needed a little ice).  Plus when he was feeling better the bunny was able to race Thomas around the train tracks for a lap or two.

That gave me a great idea!

For Christmas this year I decided to make all of the little ones in my life a homemade version of the bunny.  It is super easy with pretty simple materials!  I hope none of these little ones turn out to be quite the dare devil Brody is but everyone has a boo boo now and then.

Materials needed for 1 bunny:
1 washcloth
1 square plastic ice cube*
2 goggly eyes
1 nose
1 rubber band
1 ribbon
Hot glue gun and glue

*You can also just leave these out and just put a real ice cube in it when needed but I thought that the plastic ones were a lot less messy.

Take the washcloth and roll it up and then fold it in half with the ice cube in the middle.
Use the rubber band to make the bunnies face and hold in the ice cube.
Use the hot glue gun to put accessories on bunnies face.
Use ribbon to tie message around the bunnies neck.

Help those little ones boo boos disappear!

Month by Month pictures

Month by Month baby pictures are becoming quite trendy these days.  You can find the stickers everywhere (Target, Babies R Us, Etsy, etc.) and a bunch of links on Pinterest for cute ideas.

The problem is, where do you start?  Here are a few tips that I have learned now that I have made it through all of the months.

So I started with 8 different poses because I couldn’t decide what I wanted to do.  I don’t recommend it!  I say pick one and stick with it.  Use these steps to help you choose.

  1. Think about lighting – decide how and when the picture will be taken and stick with it.  Are you going to use a flash?  Will you take them during the day or at night?  If you are not going to take the pictures with a flash you want to use the same natural light each time. I am guilty for being the parent that realizes half way through the day that I needed to take the pictures and rush around to get everything ready.  You will see all of the pictures side by side so to me it is more important to take them at the same time of day (with the same natural light) than on the exact day.  So, on those days I realized too late, I would wait one or even more sometimes (if it was a gloomy day) to make sure that I had good lighting.
  2.  Choose a pose in the sitting position – When you are taking the first picture, it never seems easy to prop the baby up but it is much easier than getting a child with a mind of their own to lay down.  One option might be to pick a location you can do sitting or laying the baby down in the same background that you will use for each one such as a rocking chair.
  3. Think of an active child when you pick your spot. – You may want to do it on the floor or someplace an active baby won’t fall from.  One of the places we chose was the rocking chair and I always had to wait for my husband to help me so he could make sure that Carson didn’t fall out of his chair.
  4. Pay attention to the little things – How far away are you from the subject?  Are you looking up or down?  Is the background the same?  Is there clutter in the background? It helps keep the pictures uniform if all of the shots are the same.
  5. Consider adding milestones – One of my favorite sets of pictures of my son is just him laying on the carpet and writing all of the things he can do that month around him
  6. Use something to show size – A stuffed animal or something small really helps to show the growth of the child.  When choosing an object make sure it is something safe for your child to play with, there will be lots of playing in the older months.

Hope these help in your picture taking process. Good luck!

Any tips that I missed?

Free Cricut Images

Free .svg Images for Cricut Machine

When I first learned about a Cricut,  I wasn’t sure if I wanted one since you have to pay for each project on the design space.  They also seemed like very specific projects and I wanted to be able to do a wide variety of projects, some not even offered on the site.

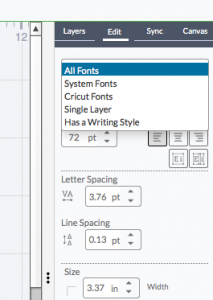
After lots of research and help from my techy husband I figured out that you don’t have to buy all of the files.  Most of them you can get for free.  First off, all of your system fonts can be used rather than paying for the Cricut font.  Your system fonts which even include all of the ones you have downloaded from the internet.

CricutScreenShot

For images, the files need to be .svg files (rather than .jpg, .png, etc.).  These files have more layers and details than just image files.  I usually don’t want to pay for all of the Cricut files so instead, I look up an image on Google images* , save the image to my computer, go to Online SVG image converter, upload my file, and it will give me a .svg that I can then load into the Cricut website.  It sounds like a lot of steps but the hardest part by far is choosing the image.

Free svg

*when looking for an image, it works best if you find an image completely filled in with color. If your image just has an outline and isn’t filled in the Cricut will make a cut on both sides of the outline sometimes ruining your cut.

Powered by WordPress & Theme by Anders Norén